TBS
Showing all 2 results
-
Radio Transmitters, TBS
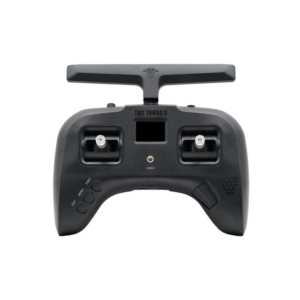
TBS Tango 2 FPV Radio Controller Transmitter
The Tango 2 is released as the smaller radio available, yet it comes with full sized Hall gimbals, Freedom TX (temporary OpenTX fork), and the lowest latency of any TX system.
Team BlackSheep has been at the forefront of perfecting the interface between FPV drone and mind. The TBS Tango 2 changes how radio remote controls will be from here on out! Despite being the smallest remote control available, it comes with full size HAll gimbals, full-featured FreedomTX (temporary OpenTX fork), the lowest end-to-end latency of any remote and transmission system, unbreakable 3 & 2-position switches, open source operating system, built-in battery, USB-C charging, and so much more! It’s not just a retouched game controller, it was designed from the ground up for R/C! The form factor and features make it the ideal take-anywhere, fly-anytime remote control.
CROSSFIRE Built in
The first radio with TBS Crossfire built in. This significantly lowers your cost, increases reliability and minimizes set up time. And the cherry on top are the LUA scripts being part of the familiar user interface. The antenna swivels out of the way, or doubles as a kick-stand when resting. TBS Cloud ready to go from the start. It all just makes sense.SKU: TBS.TANGO2. -
Radio Accessories, Radio Transmitters, TBS
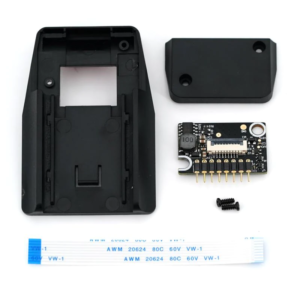
TBS Tango 2 Module Bay Add-On
This is an after-market mod to add a module bay to your Tango 2. The module bay sticks to the back of your Tango 2 and plugs into the receptacle board of your Tango 2.
Installation process
- Install the FPC cable to the PCB.
With the blue side facing up, lift the lock and slide the cable in then lock it down. - Feed the cable through the bottom and place the PCB to the module bay.
- Turn the module bay around to make sure everything fits accordingly.
- Close the case with the 2 screws provided
- Use a dremel, knife or solder tip to cut a small hole accoridng to the outline.
- Slide the flex PCB through the drilled case.
- Clean the back surface and tape the Tango 2 module bay down
- Â Install the FPC cable into the receptacle.
- Close the Tango2 case, and you’re done!
*IMPORTANT NOTE
*The first batch of Tango 2 shipped WITHOUT module bay capability. Please verify that there is a connector (in pictures above) before purchasing this add-on. Upgrade PCB’s can also be purchased!
Also, whenever opening up your Tango 2 in future, you will need to open the module bay and release the flex PCB from the socket.*We have discovered that XJT mini modules are using a pin that we did not anticipate for use in our module bay. It appears that the XJT mini module is the only module on the market that uses this pin.
Due to a hardware incompatibility between the XJT mini module and the Tango 2 (V2 and up) boards, the Tango 2 will NOT be able to support the XJT mini module.
SKU: TBS.T2ModB - Install the FPC cable to the PCB.